Panopto: Getting Started with Moodle
This article has not been updated recently and may contain dated material.
LSU Faculty and Staff members may begin using Panopto within Moodle after they've completed the following steps: enabling the Panopto Moodle Block within their Moodle course and provisioning their course in Moodle. You can optionally also download the recorder from the Moodle Block within your course.
Note: Steps 1-2 are for a single Moodle course and must be done within each course in which you plan on using Panopto. The steps are outlined below.
1. Activating the Panopto Moodle Block in your Moodle Course
The first step in using Panopto is activating the Panopto Focus Moodle Block within your Moodle course. To activate the Panopto Focus Moodle Block:
1. Login to Moodle and select your desired course.
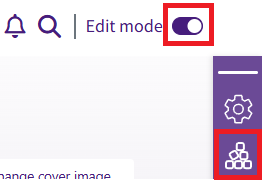
2. Turn on Edit mode, then click the Blocks sidebar menu.

3. Click Add a block, scroll to and click Panopto in the pop-up window. This will add the Panopto block. You can leave "edit mode" at this time.


2. Provisioning Your Moodle Course
The second step in using Panopto is to provision your course via the Panopto Focus Block.
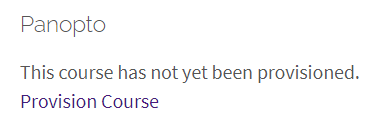
- After executing the steps for activating the Panopto block (seen above), you'll see the Panopto block. Click Provision Course within this block.

- You can click Back to Course on the page that appears.

3. Downloading the Panopto Recorder from the Moodle Block
The third step in using Panopto is to download the Panopto Recorder from the Moodle Block. Note: you will only have to do this once to download the software to any given computer.
- While viewing your Moodle course, click the Blocks button on the right side.

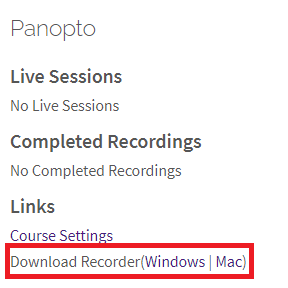
- You will see the Panopto block includes links to download the recorder for Windows or Mac; click whichever link is relevant to your computer.

- Use the appropriate installation instructions for either the Mac or Windows recorder.
- Once you've followed the appropriate download instructions you will be ready to begin using the Panopto recorder. See the following articles on recording and managing your recordings.
Referenced from: Panopto
20169
5/21/2025 1:55:59 PM