LISTSERV: Managing a Listserv
This article provides instructions for Listserv owners to manage their lists using the LISTSERV web interface at listserv.lsu.edu. All management tasks described below are performed through the web portal — email-based commands are not covered here.
- Note: Listservs may only be owned by LSU A&M faculty or staff. Students cannot be list owners. If a student organization needs a listserv, a faculty or staff advisor must request and own the list. Student members can be added as subscribers or authorized senders by the owner.
Logging In to the Listserv Web Interface
- Open a web browser and navigate to https://listserv.lsu.edu
- Click the Log In link in the upper-right corner of the page.
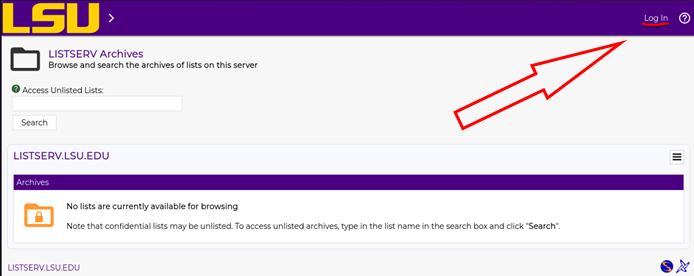
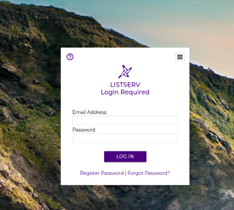
- Enter your LSU email address (e.g., yourname@lsu.edu) and your LSU password.
- Click Log In.
Troubleshooting Login Issues
- Password expired? If you cannot log in after a break or holiday, your LSU password may have expired.
- Non-LSU domain users (e.g., @agcenter.lsu.edu): If your email is not part of the main LSU domain, you will not be able to authenticate with your existing domain password. Instead, use the Register Password button on the login page (next to the "Forgot Password" link) to create a password specifically for the Listserv portal. You can then log in with your email address and this newly created password to manage any lists where your email is listed as an owner.
- Browser issues: If you continue to experience problems, try clearing your browser cache or using an incognito/private browsing window.
- Still can't log in? Contact the ITS Service Desk at 225-578-3375 or servicedesk@lsu.edu, or submit a troubleshooting ticket via: ITS Service Desk - Submit Ticket
Navigating to Your Lists
Once logged in:
- Click on the List Management dropdown in the top navigation menu.
- Click on List Dashboard from the dropdown options.
- You will see a list of all Listservs you own. Click on the name of the list you want to manage.
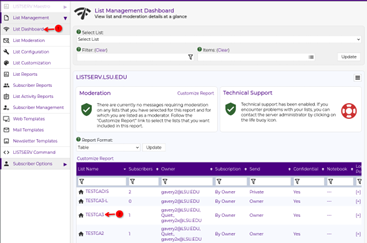
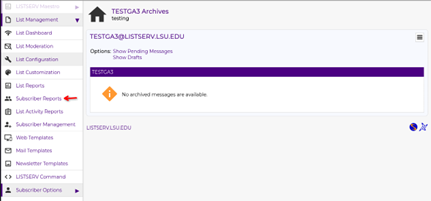
- Note: Clicking a list's name will select it as the active list and initially bring you to the Archives page for that listserv. To perform management actions (e.g., subscriber management, list configuration), use the left-hand menu — your selected list will carry over to whichever management page you navigate to next.
Managing Subscribers
Subscriber management can be done from the Subscriber Reports page. To get there:
- Make sure you have selected your list (see Navigating to Your Lists above) or select which list you’d like to manage via the drop-down menu Select List at the top of the page after clicking on Subscriber Reports.
- In the left-hand menu, click on Subscriber Reports.
You will see a list of all current subscribers, with checkboxes next to each entry, and an Add Subscriber field near the top of the page.
Adding a Single Subscriber
- On the Subscriber Reports page, locate the Add Subscriber field near the top of the page.
- Enter the email address of the person you want to add.
- Click Add Subscriber.
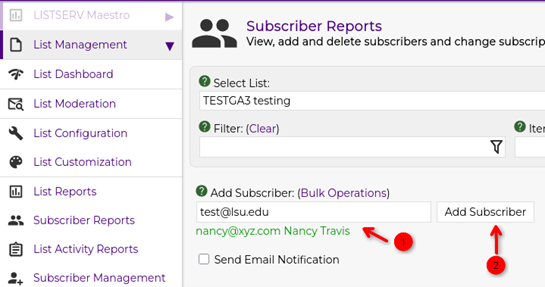
- Tip: The subscriber will be added immediately. Depending on your list settings, or the checkbox for Send Email Notification being checked, they may receive a welcome/notification message.
Removing a Subscriber
- On the Subscriber Reports page, locate the subscriber(s) you want to remove.
- Use the checkboxes next to each subscriber to select one or more subscribers.
- Once your selections are made, click the Unsubscribe or Delete button.
- Confirm the removal when prompted.
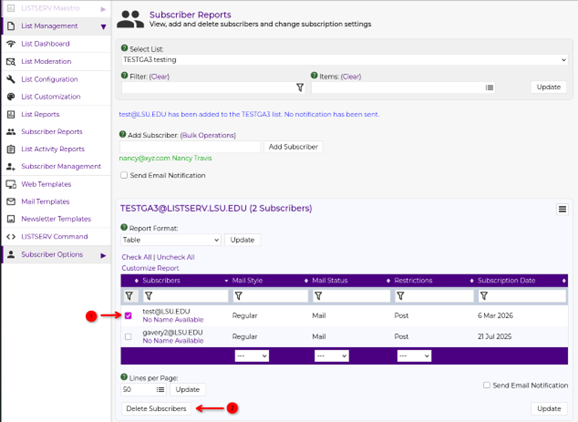
Tip: You can select multiple subscribers at once using the checkboxes to remove several users in a single action.
Bulk managing Subscribers
If you need to add a large number of subscribers at once (e.g., when populating a new list or updating membership):
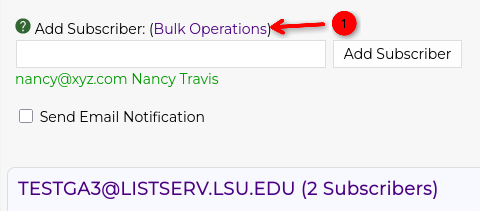
- On the Subscriber Reports page, look for the Bulk Operations link located next to the Add Subscriber header.
- Click Bulk Operations to open the bulk import interface.
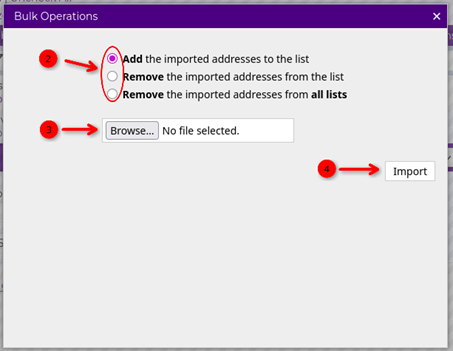
- Prepare a plain text file (.txt) with one email address per line. For example:
jdoe1@lsu.edu
jsmith2@lsu.edu
mbrown3@lsu.edu
- Upload the file with the list of email addresses via the browse button.
- Select whether you would like to Add/Remove all emails listed in the text file you created.
- Important: As the list owner, you are responsible for maintaining your subscriber list. ITS/Network Applications does not manage subscriber membership on your behalf. If you are replacing a legacy broadcast list, you will need to obtain your recipient list independently (e.g., from a Workday report or your department's records) and import them yourself.
Alternatively, to remove all subscribers:
- Increase the lines per page and then click the check all button.
- Navigate to the bottom and click the Delete Subscribers button.
- Confirm the action when prompted.

- Caution: Removing all subscribers is irreversible from the web interface. Ensure you have a backup (e.g., a downloaded subscriber report) before performing this action.
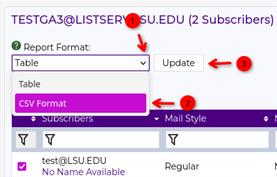
To export a list of your current subscribers:
- On the Subscriber Reports page, look for the report format drop down menu.
- Click on the drop down and select the csv format.
- Click the Update button which should start a download of a csv of all subscribers.
- Tip: It's good practice to periodically download your subscriber list as a backup, especially before making large changes.
Managing Owners
List owners have full administrative control over the list, including the ability to add/remove subscribers, modify list settings, and add other owners or authorized senders.
- Important: Only LSU A&M faculty or staff should be added as list owners. Students should not be designated as owners. If a student needs to send messages to the list, add them as an authorized sender instead (see below).
Adding or Removing an Owner
- Select which list you would like to edit. (see above Navigating to your lists section)
- Click on List Configuration.
- Find the Owner field(s) in the list configuration under the Administrators tab.
- Add/Remove the owner's email address to/from the owner= field. Multiple owners can be listed, one per line.
- Save the configuration changes with the Update button in the bottom right.
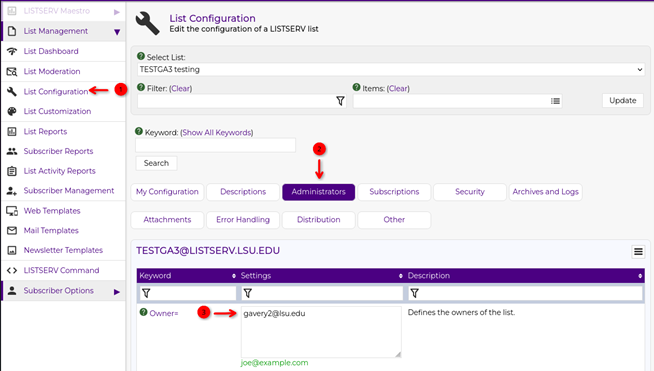
- Note: A list must always have at least one owner. Do not remove all owners from a list. If it will no longer be managed please submit a request to remove the list via the listserv troubleshooting service.
Managing Authorized Senders
By default, list settings may restrict who can send messages to the list to only the owners. Authorized senders are individuals who are permitted to post messages to the list without being an owner.
Adding/Removing an Authorized Sender
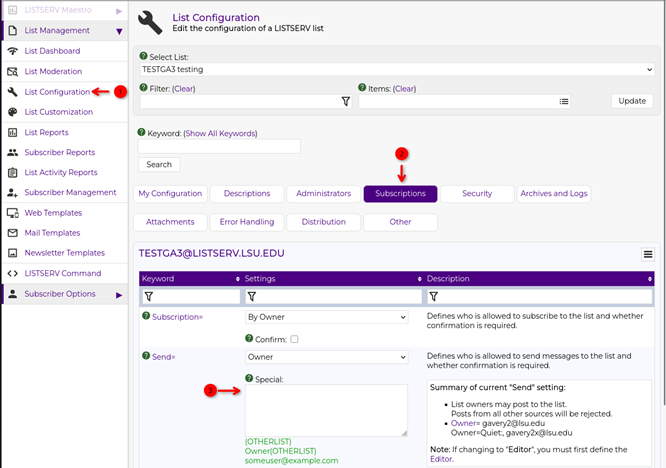
- Select which list you would like to edit. (see above Navigating to your lists section)
- Click on List Configuration.
- Click on the Subscriptions tab.
- Add/Remove the email address of the person you want to authorize under the send= Section in the Special field, one per line.
- Save the configuration changes with the Update button in the bottom right.
A Note on Vanity/Alias Email Addresses
Listserv authenticates senders based on the From address of the email. If a user has been assigned a vanity or alias email address (e.g., firstname.lastname@lsu.edu) that differs from their original address (e.g., flastname1@lsu.edu), please Add the vanity address as an authorized sender or owner on the list.
Getting Help
- Submit a Listserv Troubleshooting Ticket: ITS Listserv Troubleshooting
- Service Desk: Call 225-578-3375, email servicedesk@lsu.edu, or visit in person at the Frey Computing Services Center.
- Submit a Ticket: itservice.lsu.edu
17605
3/12/2026 4:20:22 PM