The Moodle Book resource is a multi-page resource that displays information in a book-like format, with chapters and subchapters. Books can contain media files as well as text and are useful for displaying lengthy passages of information that can be broken down into sections. A book may be used to display original text written by the instructor on different content topics, embed multimedia resources, or organize course materials that are external to Moodle.
To Add a Book:
- Scroll to the bottom of the course page and click Create learning activity.

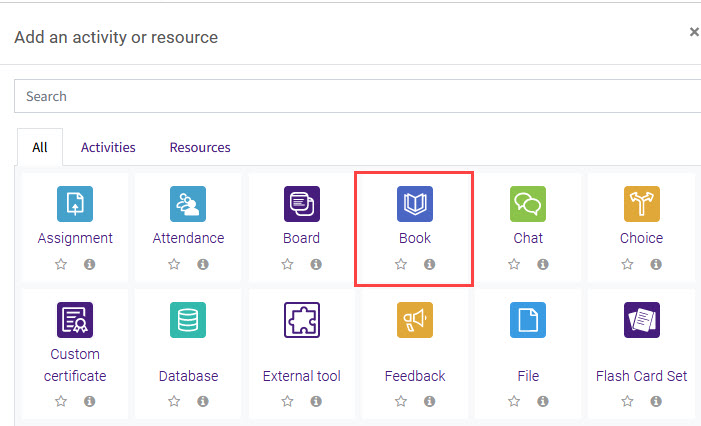
- On either the All or the Resources tab, select Book.

- Fill in the book Name. Best practice is to give the book a name that will explain what it contains. If you want to add context, include a Description that explains how the contents fit into the course materials.
- Customize the rest of your book settings. Here you can set the appearance of the chapter titles and navigation links, set restrictions and activity completion, and add tags for easier searching. For a complete list of possible settings, see the MoodleDoc on Book settings.
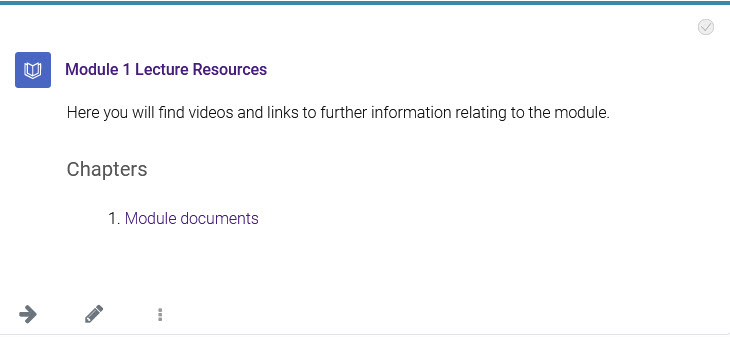
- Save your book. It will display in the section as a linked title with the description and the word "Chapters" beneath it. Chapter titles are linked.

Editing a Book
Once you have created a book, you can then fill it with content and make other edits. For best practices for using the book resource, see GROK article 20225, Book Overview.
To customize the content in your book, you will first need to add chapters. After you create the book, do the following:
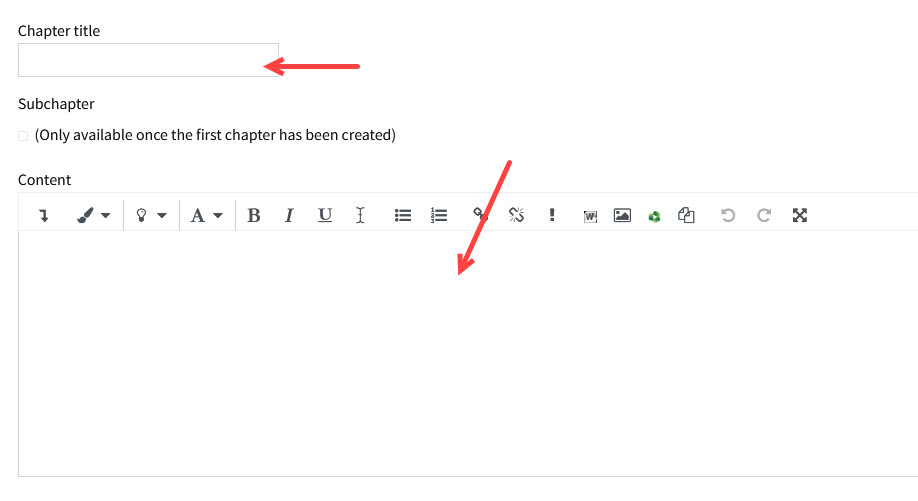
- Click on the title of the book. If the book is empty, this will automatically bring you to the editing screen for the first chapter. Here you can enter a title and add content.

- Save your chapter.
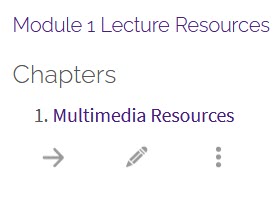
Now that you have added a chapter to the book, you will see the chapter title hyperlinked below the book title in the module. As you add chapters, more links appear here.

To add more chapters, click on the book or existing chapter title. Then, click the Edit button. This will produce the editing icons beneath the existing chapter title in the table of contents. To add a new chapter, click the "+" icon, which will bring you to the editing screen for the new chapter. This chapter will be added beneath the icon you clicked.

Clicking the Edit button also allows you to move, edit, delete, or hide existing chapters. When you have added more than one chapter, you will see the option to move them.

You can also create subchapters when you have created more than one chapter. To make a chapter a subchapter, enter its editing screen by clicking the gear icon. Under the Chapter title box, the Subchapter check box is now enabled. Click the box to make this chapter a subchapter.
NOTE: Be cautious when deleting chapters! If you choose to delete a chapter that has subchapters beneath it, all of those subchapters will also be deleted. There is no recycle bin for book chapters, so these items will be permanently deleted.
Need More Help?
Visit the following pages for more information on editing the quiz. Please note that these articles do not show the Snap theme, but functionality is the same. All links open in a new window.
For more information on Moodle Books, refer to this GROK article: Moodle: Activities & Resources: Book Overview